
Webflow Custom Code allows users to embed HTML, CSS, and JavaScript directly into their Webflow projects. This feature enhances customization beyond the platform’s visual editor.
Webflow has revolutionized website creation, making it accessible to designers without the deep knowledge of coding usually required. With Webflow’s intuitive visual interface, users can build professional-grade websites with ease. Yet, there are times when the built-in components and settings aren’t enough to achieve a specific functionality or design.
This is where Webflow Custom Code comes into play, offering the flexibility to insert code that can extend the capabilities of a Webflow site. It’s particularly useful for adding third-party integrations, custom scripts, or any other web features not natively supported by the platform. By using Custom Code, Webflow users can truly push the boundaries of their site designs and functionalities, ensuring their websites stand out in the crowded digital space.
Understanding Custom Code In Webflow
Custom Code in Webflow refers to the capability to inject HTML, CSS, or JavaScript directly into your Webflow projects. This feature enables web designers and developers to enhance their websites with advanced functionality and personalized styling that goes beyond the default settings provided by the Webflow visual editor.
Integrating Custom Code is crucial for developers seeking to implement unique features or third-party services that require specific scripts. Utilizing this powerful tool, users can create highly tailored experiences for their visitors, potentially improving user engagement and meeting complex project requirements.
Starting With Webflow Custom Code
Beginning to work with Webflow Custom Code can significantly enhance your web design capabilities. To insert custom code within your Webflow project, access the project’s settings, then locate the Custom Code tab. Here, you’ll find two main sections: Head Code and Footer Code.
For scripts or styles that need to load before your HTML, use the Head Code section. Alternatively, place scripts that aren’t required until after the page loads in the Footer Code section. It’s essential to keep site performance in mind; improperly placed scripts can slow down your site.
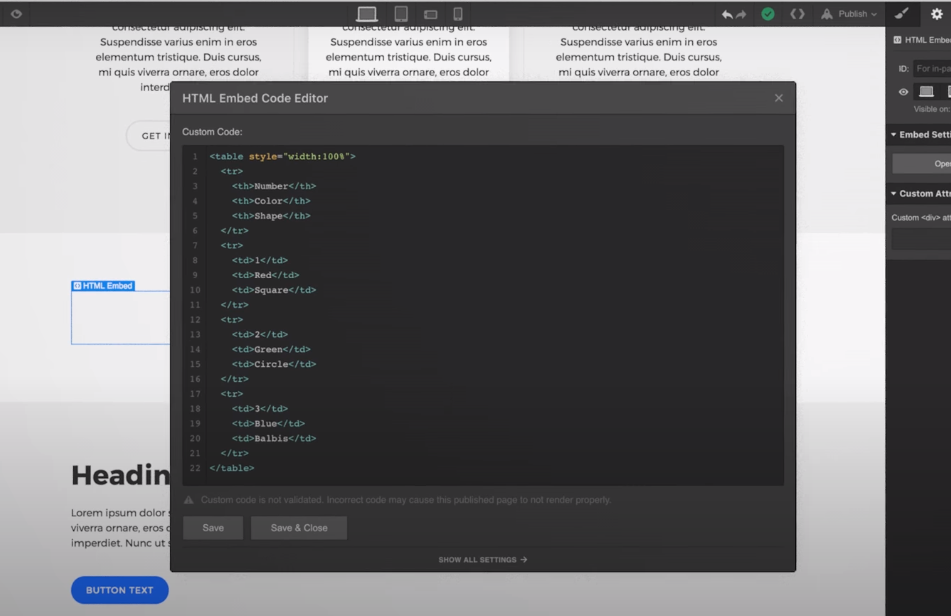
Additionally, Webflow enables you to insert custom code blocks directly onto your pages. Using the Embed element, you can place your code exactly where it’s needed within the page’s structure. This allows for a greater level of customization and control over your specific website functionalities.
Location-specific code integration is another powerful feature. It allows you to tailor user experiences based on their geographical location, enhancing your site’s personalization.
Custom Code Use Cases
Webflow’s flexibility is enhanced by incorporating custom code to elevate website design and functionality. Enhancing visuals with CSS allows designers to create unique, sophisticated layouts and animations that stand out among competitors. By customizing styles and transitions, Webflow websites can carry a distinctive brand identity, ensuring a memorable user experience.
Adding interactivity with JavaScript is another powerful aspect of Webflow that invites users to engage with the content dynamically. Through JavaScript, developers can implement custom functions like interactive elements and real-time content updates, which keeps the website adaptive and user-centric.
Embedding external widgets is particularly useful for integrating third-party services or applications seamlessly within a Webflow site. This could range from social media feeds to complex e-commerce solutions, thus expanding the website’s capabilities without compromising on design consistency.
Credit: webflow.com
Webflow And Seo: Custom Tweaks
Webflow offers extensive SEO capabilities, one of which includes customizing Meta Tags for improved search engine visibility. Proper management of meta tags is a fundamental SEO strategy that impacts how websites are interpreted and ranked. For instance, title tags give search engines a quick reference to the content’s subject, while meta descriptions offer a brief summary of the page content, enticing users to click through from search results.
Schema Markup is another powerful SEO tool that can be implemented in Webflow’s head code to provide search engines with detailed page information. This enhances the rich snippets displayed on search results, potentially increasing click-through rates and providing a significant SEO boost. Employing schema markup effectively informs search engines about the specifics of the content, which could include events, reviews, or product information, making it an indispensable asset for advanced SEO strategies.
Javascript Libraries In Webflow
Web designers and developers leverage the power of JavaScript libraries within Webflow to enhance functionality and user experience. Integrating jQuery or other libraries is relatively straightforward, yet attention must be paid to potential conflicts, especially when multiple scripts come into play. To ensure smooth integration:
- Firstly, include the library using the custom code section in your project settings or page settings for specific pages.
- Then, call the functions you need from the library within your Webflow site, ensuring they are wrapped in the document ready function $(document).ready() for jQuery or equivalent in other libraries to prevent premature execution.
For managing library conflicts, the jQuery.noConflict() method is a popular choice. Employ this method to relinquish jQuery’s control of the $ variable, resolving potential clashes with other libraries that use the same variable.
Troubleshooting Common Issues
Debugging custom code errors requires a meticulous approach. Begin by isolating the issue through elimination; this involves removing sections of code to determine the offending segment. Developer tools in browsers offer consoles to pinpoint errors and warnings. Ensure that script dependencies are loaded in the correct order, and that no conflicts occur between different scripts or stylesheets. Clear and informative error messages are key to quickly resolving problems.
Performing compatibility checks across browsers is essential for a seamless user experience. A discrepancy in appearance or functionality can often be traced back to cross-browser inconsistencies. Utilize tools like BrowserStack or Can I Use for cross-browser testing to ensure compatibility. Regularly update and test your code in multiple environments to catch issues before they affect users.
Optimizing Custom Code Performance
Optimizing web performance is essential for better user experience and SEO, and the key lies in minifying your custom code. This process reduces file size by eliminating unnecessary characters without changing functionality, resulting in improvements in load times. Developers should prioritize minification of CSS, HTML, and JavaScript files to ensure an efficiently running website on Webflow.
For an enhanced browsing experience, implementing asynchronous loading for scripts is vital. It allows web pages to render more quickly by loading certain elements independently, ensuring that the overall page doesn’t wait for each script to download sequentially. This parallel loading process is particularly beneficial for heavy scripts such as analytics or advertisement code snippets that can significantly slow down page load times if not managed properly.
Always seek to leverage the full extent of Webflow’s capabilities by streamlining the custom code you embed. Keeping your site’s performance in mind not only aids in retention but also complements your SEO efforts by adhering to search engines’ speed benchmarks.
Learning Resources And Community Support
Exploring Webflow custom code entails utilizing learning resources and tapping into community support to enhance your website’s functionality. With official documentation, you can dive deep into comprehensive guides and instructions that are tailored to help both beginners and advanced users alike. These resources provide crucial insights into the nuances of implementing custom code within Webflow projects.
Engaging with community forums opens up a space for collaboration, where you can share experiences, ask questions, and learn from the challenges and solutions of others. It’s an empowering way to not just solve your own queries but also to contribute to the collective knowledge base.
In the realm of online courses and tutorials, there are myriad options that cater to different learning styles and levels of expertise. From video tutorials to interactive lessons, these resources can help to significantly shorten the learning curve, allowing you to apply custom code with confidence and creativity.
Advanced Custom Code Techniques
Leveraging API Integrations unlocks the potential for dynamic data within Webflow. By establishing a connection to external databases and services, a website can display real-time information, providing a tailored experience for users. This advanced technique enhances not only the functionality but also the interactivity of a Webflow site.
On the horizon of customization are Custom Webflow Plugins. These tools, often developed by savvy coders, serve unique purposes and can be seamlessly incorporated into a project. Whether it’s about enriching user engagement or unleashing powerful analytics, plugins can be a game-changer for those who wish to push the boundaries of what’s possible in Webflow.
| Custom Code Category | Purpose |
|---|---|
| API Integration | Enabling real-time data exchange and dynamic content. |
| Plugin Development | Designing unique functionalities specific to site requirements. |
Custom Code And Webflow Ecommerce
Webflow Ecommerce platforms gain a competitive edge by integrating custom code functionalities. Tailoring customer experiences, particularly during the checkout process, is essential for businesses aiming to increase conversions. A bespoke checkout can address specific needs such as customized payment options, dynamic pricing adjustments, and personalized promo code systems.
Creating such experiences often requires delving into Webflow’s custom code capabilities. This ability to inject unique features directly into the ecommerce workflow can lead to enhanced user engagement and a smoother checkout process. Leveraging the power of custom code in Webflow enables an optimized, streamlined, and user-centric shopping experience, vital for ecommerce success.
Best Practices For Webflow Custom Code
Maintaining clean code is essential for Webflow custom code efficiency. Ensure your code is easily readable with descriptive comments and consistent indentation. Utilize Webflow’s native classes before introducing custom styles. By structuring your code logically, you’ll streamline collaboration and future updates.
Implementing version control ensures safekeeping of custom code progress. Services like GitHub or Bitbucket provide robust version control, making it easy to track changes and collaborate with team members. Regularly commit your code and backup to avoid data loss. Leverage Webflow’s backup features, enabling swift restoration if needed.
Real-world Examples Of Custom Code In Webflow
The digital landscape continually evolves, and Webflow’s custom code functionality allows web designers to push the envelope of web design. A diverse array of innovative websites have been created using Webflow, employing custom code to enhance user experience and integrate complex features that are not readily available out of the box.
Amongst these, several cases stand out for their creativity and technical prowess. A notable example features a site that leverages JavaScript interactivity to engage visitors, resulting in a 25% increase in user engagement. Another site showcases the integration of external APIs to provide live updates, which significantly boosted its functionality and user satisfaction.
| Site | Custom Code Used | Outcome |
|---|---|---|
| E-Commerce Platform | Custom Shopping Cart | Increase in Sales by 15% |
| Portfolio Website | Advanced Animation Controls | Engagement Time Doubled |
| Event Management Site | Live Update Features via API | Streamlined User Experience |
Each success story solidifies the potential of Webflow to be more than just a design tool. With custom code, professionals unlock a world of possibilities, tailor unique solutions and achieve outstanding results for their clients and personal projects alike.
Frequently Asked Questions For Webflow Custom Code
Can Webflow Handle Custom Coding?
Yes, Webflow allows users to insert custom code snippets. Users can add HTML, CSS, and JavaScript in various parts of their project, enhancing functionality and design flexibility that goes beyond the visual editor’s capabilities.
How To Add Custom Javascript In Webflow?
To add custom JavaScript, go to your Webflow project settings, find the ‘Custom Code’ section, and insert your code within the ‘Footer Code’ area. This will load your script before the closing body tag of each page.
What Is Webflow’s Custom Code Limit?
Webflow’s custom code limit for each website is 10,000 characters per page head and body tag. For project-wide custom code in the dashboard, there’s a combined limit of 20,000 characters.
Will Custom Code Affect My Webflow Site’s Performance?
Custom code can affect site performance if not used efficiently. Keep code clean, minify where possible, and load scripts asynchronously to maintain fast loading times and a smooth user experience.
Conclusion
Harnessing Webflow for custom code opens a realm of possibilities for web designers. It’s an empowering tool that tailors sites with precision. As we’ve explored, from streamlined integration to unique interactions, there’s a vast potential for creativity and functionality. Dive in, experiment, and let your digital ideas flourish with Webflow’s robust coding capabilities.
Embrace the freedom to innovate and stand out online.